I have taken a bit of a break from the layout while I get caught up on some of the new August Lego releases. I purchased most of the new batch of Minecraft sets along with the Heavy-Haul train and some other misc city sets. I am also waiting for a modest pick-a-brick order to come in to keep working on the layout. I have found that most of the time, if I am not dealing in rare parts, pick-a-brick is cheaper then Ebay for specific parts. The only down side is it takes a lot longer to get the order.
I decided to go nuts and just build all of the remaining bench work at once and get the whole layout set up as far as the foundation. I have gotten to the point were its hard to go forward piecemeal as I will start running into issues with track lining up. So later this week and am going to buy the lumber to build modules C and D and at least get the train track laid out and start figuring out where the rest of the buildings are going to go. From there it will be quite some time to collect up the baseplates I need and start filling in details, but at least I will be able to run my trains!
Tuesday, August 11, 2015
31038 Changing Seasons
31038 is the latest Creator series house, having just been released in the US in the last month. I always like the creator buildings and was intrigued by the 3 in 1 construction options representing three different seasons. I am used to the 3 in 1 designs having the primary (advanced) model being by far and away the nicest build with the other two models being at best awkward so I figured this set might actually give me a reason to build the other sets.

The main model is the "Advanced" build and is meant to represent Spring/Summer. It includes a house with dark red roof, a raised white patio with sunken pool area complete with pool basketball hoop and a diving board. There is also a nicely built up outdoor grill that utilizes the red light brick that is included to represent the fire in the grill.

Rounding out the outside is a small table with glass mug, mail box, garden, lawn chair, mower, tree and a brick built bird. Inside, the detail is pretty sparse with a single non-rotating chair and table with lamp. Most of the windows have flower boxes adding a nice detail. The building splits in half on hinges all the way down to and including the base plate. There is also a very small car that is included that is in the same vein as the ones in a number of other recent Creator sets. The car is way too small and the mini-figure looks ridiculous sitting in the vehicle. The build starts off with the pool area which is a very odd build as you are constructing the foundation out of white slopes that mostly end up getting hidden from view.

The down side to the three seasons focus is that there are some sacrifices made to the overall function and feel of the model so as to use bricks that serve completely different roles in the other builds. This leaves the whole set feeling a bit off, but overall I still like the novelty and flexibility of the three seasons options and the design is different enough from previous ones to feel fresh and unique. The set includes two mini-figures, a kid and an adult and the different builds have the minifigures put together in different combinations to make new figures. The set feels a bit over priced at $49.99 for 536 pieces, especially compared to other recent creator sets like 31025 Mountain Hut and doesn't have quite the level of polish that I like in my creator sets.
Monday, July 27, 2015
Lego City Layout: Street Life
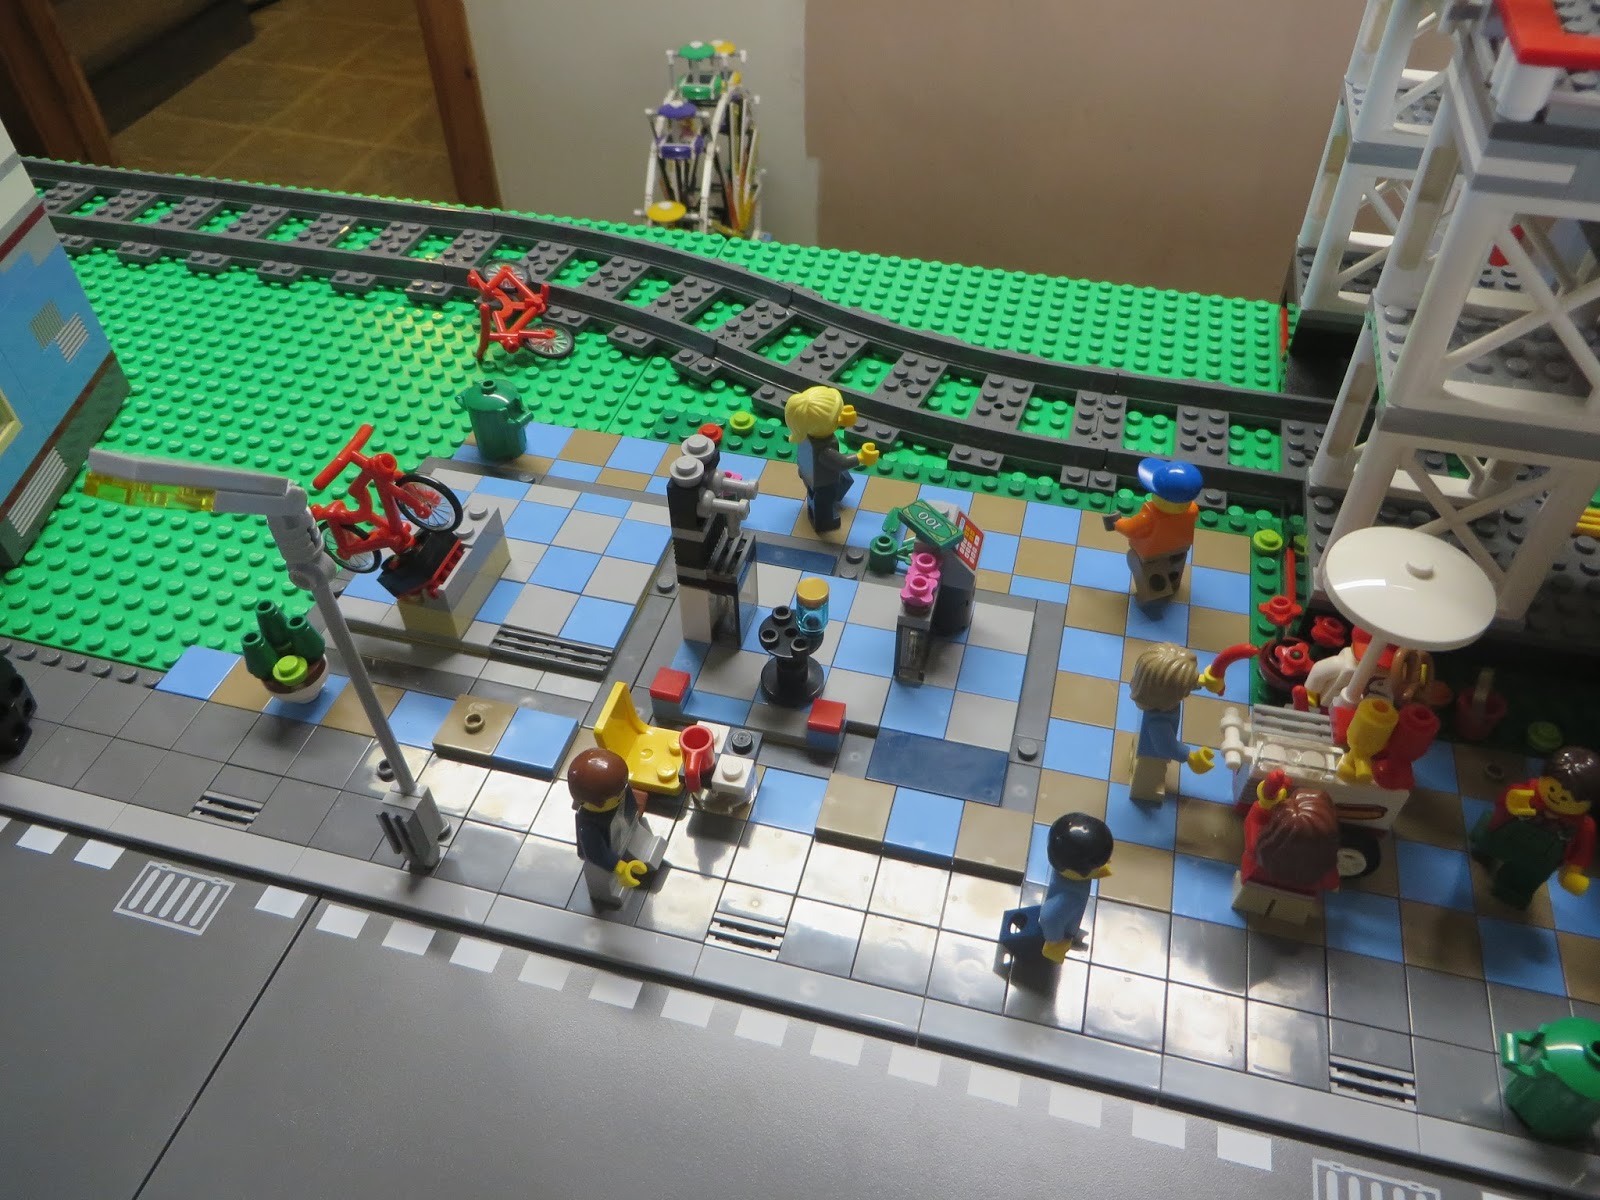
I received more parts in the mail today to help move along the sidewalk and floors of some of the creator buildings, mainly 31026 Bike Shop Cafe. I was able to finish tiling the public square area next to the 7937 Train Station, which hosts a hot dog stand and the 40140 Flower Cart while leading to a back alley running behind 31026 Bike Shop Cafe. I also finished most of the work in front of the buildings.


I wanted to be able to still access the interior of the buildings, but some of the Creator houses/stores swing open on hinges instead of having the removable upper floors like the Modular buildings. I tried making the swinging function work with the front of the building fixed, but it was too difficult and limited my options on what I could do behind the structures (to give clearance for them to open). So I decided to try a similar technique to the buildings with lift off floors, and instead have the entire building lift off the foundation/ground floor. The building still hinges open, so you can lift it off and open it up to get inside. This also allowed me to put floors in and improve the fixtures on the ground floor. I removed the clip systems and the bases from the buildings, rebuilt the bottom row of bricks to make it sturdier and fill in for the removed clips and then laid down the smooth finishing tiles around the edge as the foundation the building would sit on. I put a sub-floor down and then covered it with a layer of 2x2 finishing tiles in checkerboard patterns. Ultimately it works reasonable well, in addition to making things more accessible by being able to easily remove the buildings. It also improves the interior considerably.
Friday, July 24, 2015
Lego City Layout: Module B

I whipped up the table for the second module for my layout last week. I also completely rearranged my garage and finished tearing down all the bench work for the old HO train set and boxed up and organized most of my Legos. The legs on the new modular tables was a bit on the wobbly side so I made 45 degree wooden braces that made everything alot more solid. I positioned the two current modules and bolted them together and everything seems to be working fine.

Module B is meant to house the rest of the Creator modular buildings including the 10232 Palace Cinema, 10224 Town Hall and 10218 Pet Shop, along with a spur of track to house some sort of industry (current place holder is just a freight transfer station), 60050 Train Station and some other miscellaneous structures.

The last of the Modular buildings have been re-based onto the road plates and about half the side walk has been done. I am suffering from a shortage of materials for light posts and sidewalks and am stuck waiting for stuff to come in from E-bay. All in all I am pretty happy with how its coming!

Wednesday, July 15, 2015
60097 City Square: Small Buildings Vehicles and Accessories
The Coffee stand is pretty basic with a bike rack on one side and a picnic table with umbrella on the other. Inside there are a couple different types of coffee machines behind the front counter, which has a couple of red coffee cups and a creamer container. This building is supplied with a nice sign that reads "The Coffee Chain" and a detailed barista to work the counter. The building itself is fairly boring, and there is a 1x4 space behind the sign that should have a finishing tile on it to match the rest of the finished roof. Otherwise a nice little addition.


The news helicopter is a nice open sided vehicle with some decent detailing and a camera hanging off one side, its a bit of an upgrade above some of the awful smaller helicopters that have shown up in some other recent City sets. It also includes a helmeted pilot.
The tow truck is pretty standard fare with a winch to pull the stranded car up onto the tilting bed. It is done up in the same green and white "Auto Service" colors that the current 60081 Pickup Tow Truck has. Its a nice model that adds some playability to the service station. There are a total of three cars included in this set for the tow truck to tow, a red couple, a black sedan and a yellow pickup truck. All are pretty basic and are of the much maligned 4 stud wide design, but its still a nice bonus and lets you fill up your city streets quick!

The Lego delivery truck is a simple design but does have opening cab doors and doors on the back, along with a driver wearing Lego Store regalia and a hand cart with two printed Lego boxes. Again, much like the tow truck does for the service station, the Lego truck adds some depth to the Lego store.

The last major item is the orange and black articulated tram. This is a fairly large vehicle with three sections, the two main end sections each have a driver seat and seats for four passengers and the middle section is labeled to hold bikes. You can comfortably fit 10 minifigs in the tram. It uses small disc wheels and the glass sides all open upwards to gain access to the interior. There is very little internal detail an no driver controls to speak of. My only real complaint is the green dot "digital" tram number display, its hard to see even under normal circumstances, but the instructions have you placing all four stickers towards the ends (which makes sense) but behind those particular glass panels are white door frames, and those white door frames lighten up the back ground enough that its almost impossible to see the numbering.
Last of all, you get a decent hot dog stand with cook, a child minifig eating a hot dog, a pizza delivery guy one a motorbike with boxes of pizzas flying off the back, a pedal bike, a newspaper rack, dog and a couple other minifigures.

Overall, I love this set, the diversity of buildings, mini-figures, details and accessories provides a ton of play AND display value while still having a fairy solid detail level. The components offer some interplay that gives depth to the whole set and there are lots ways this set can add to a larger city and/or train display!
Monday, July 13, 2015
60097 City Square: Large Buildings
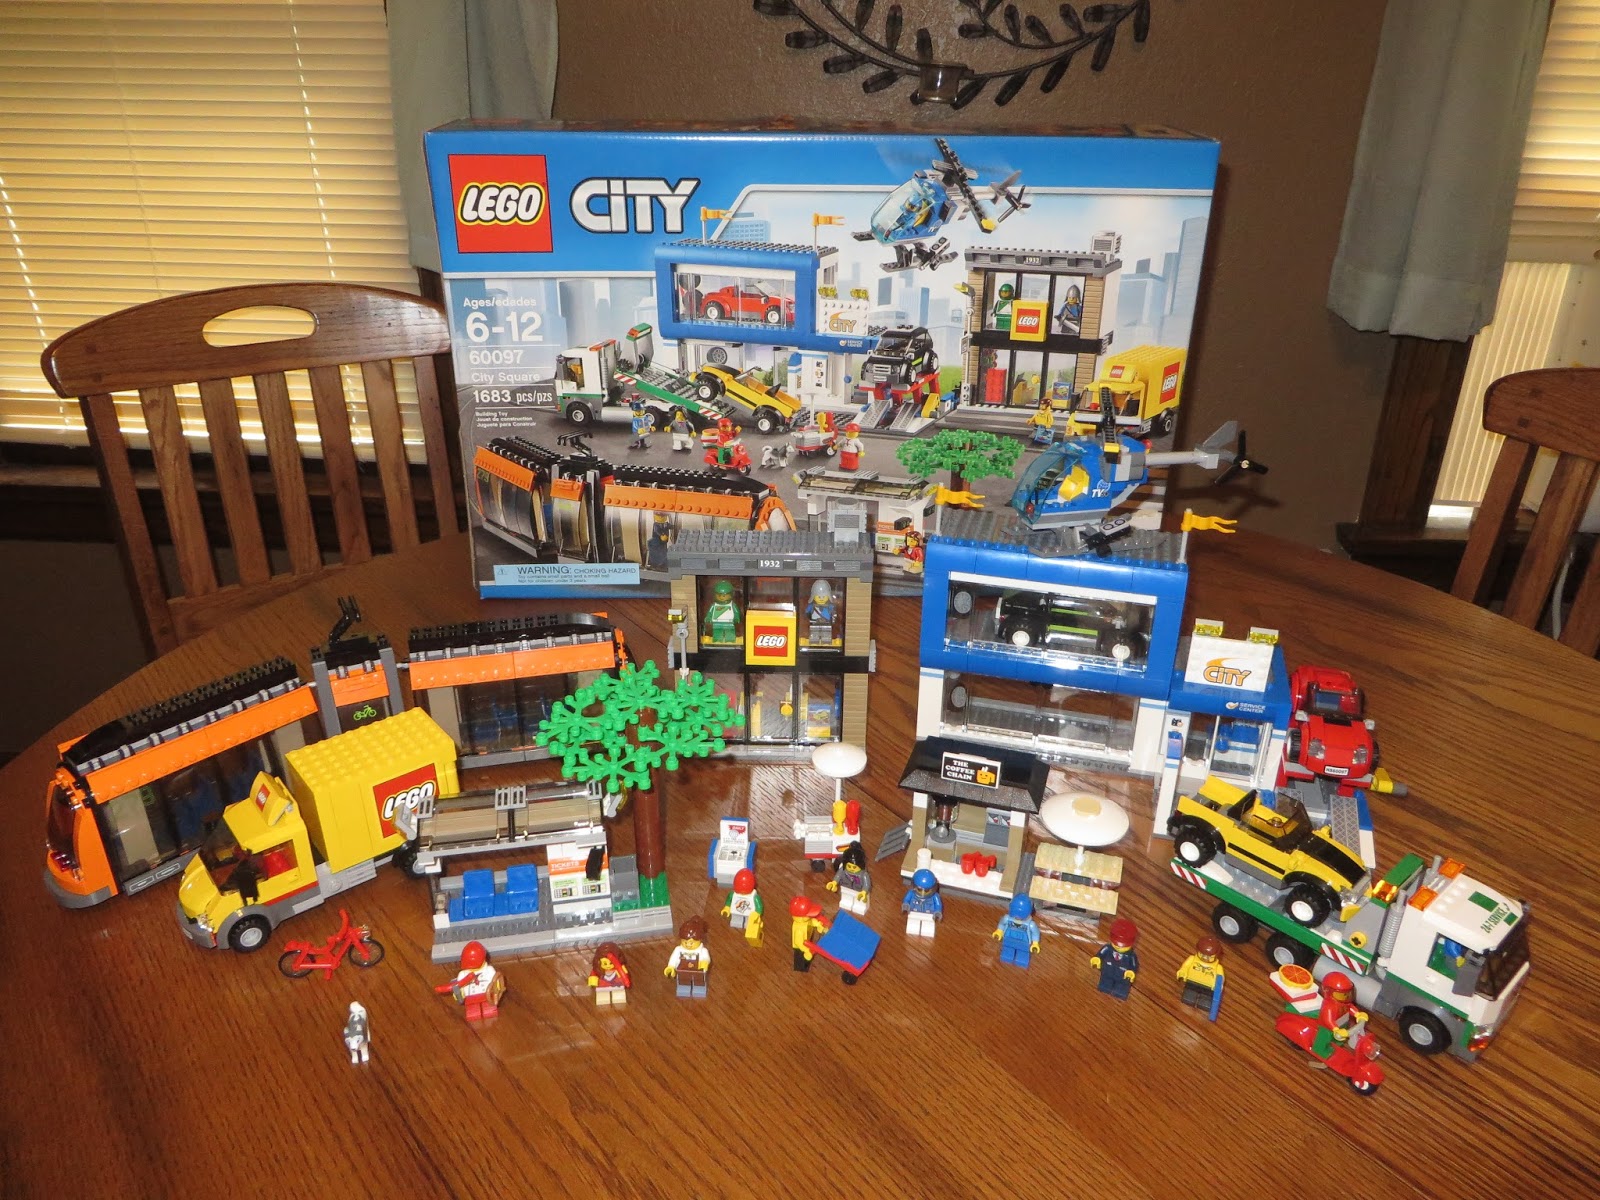
I recently ordered 60097 City Square figuring it would be a nice addition to my City Layout, adding a wide variety of minifigs, vehicles, a couple decent buildings and some nice smaller structures. At $189.99, it felt a bit pricey, but once I got it in the mail and opened it up, I was pleasantly surprised by just how much was in it (the box art does not do it justice). The set includes 16 numbered bags plus a bag of base-plates and another of windows for the tram. The set includes two large buildings, a Lego store and an care dealership with service shop; two smaller buildings, a coffee stand and a tram station, three cars, a Lego truck, a tow truck, a news helicopter, an articulated tram, 14 mini-figures and a host of other minor accessories. All of which would fit well in any City/Train themed layout. This is a large set, so I am going to break this review up into a few parts, the first which will cover the Care Dealership and the Lego Store. This set shares some tie ins/similarities to the 60026 Town Square and 8408 Public Transport Station.

First, a bit more information on the two larger buildings. First off, there is the car dealership with attached service station which includes a working car lift, nice signage, and a two story show room.


Inside we see all sorts of fun details. There is a large red 2x4 brick on display in the window, a demolition set box display in the other window, a service desk with computer and a slow to hold a brick built Lego bag and a mini-figure displaying (using a micro figure). On the two walls we have a pick-a-brick display behind the service counter and on the other side are some glass shelves with various set boxes with printed faces. There is also a ledge behind the second floor windows that holds classic Space and Castle minifigs, a really nice touch that makes this building shine! The building also includes a child minifig and a Lego Store employee minifg. There is also a Lego shipping truck with driver that will be reviewed in a later section. All around I love this building and my only possible complaint is that the otherwise standard street light, lacks the grey vent piece on the 1x2 base that some of the other City sets have.
First, a bit more information on the two larger buildings. First off, there is the car dealership with attached service station which includes a working car lift, nice signage, and a two story show room.

The dealership also includes sliding pocket doors on the bottom floor of the show room, two tire displays, room for a car to be display on the second floor, a small tool rack in the service station along with a desk. I love the blue curved sections around the second floor show room and the roof line of the service station. My only complaints about this section are that the thee window/door frames on the show room area (two on top and one on the bottom opposite the service station) do not have any glass in them, which leaves the side views unfinished. This seems to be a compromise to allow the tire displays to fit, but does not seem worth it. The set comes with a black car, a red car a service attendant, a female driver and a tow truck with driver (all which will be reviewed in a later section).

Next we have a nice little Lego Store, smaller than the Car Dealership, but still manages to squeeze in a lot of fun internal details for a nice overall package. This is a two story tall building with only one floor. The building is a nice fusion of an older traditional row store with a modern update using glass windows and Lego Store signage. The traditional feel is given using the back side of masonry blocks along with nice detailing on the roof line and a building date (1932). The store also includes a roof top vent/HVAC, some vent detailing on the building sides and a standard city light post with a bus stop sign.


Lego City Layout: Sidewalk Improvements
I had a couple more packages of bricks from Ebay show up today and that allowed me to expand some of the sidewalks and add a few more details, mainly drains, more fire hydrants and some 2x2 finishing tiles with a single stud on top to make it easier to pose mini-figures.


I should have more bricks coming over the next few days to allow me to substantially expand the side walk down past the train station. I also have been working on creating a hinged back for the train station office as its one of the few open back buildings that will have its back to the street, and I wanted the street view to look clean.

Saturday, July 11, 2015
Lego City Layout: Modular Buildings
When I decided to build a layout, I knew I wanted the Modular Buildings to one of the focal points of the display. I also new that I wanted them fully integrated onto the Lego road base-plates.

Most of the layouts I have seen online that include Modular buildings end up leaving the sets on their initial base-plate and then just expand the side walk out to cover the studded portions of the road base plate. While this is a much easier way of doing it, it does not give me the look I am shooting for, so I knew I would need to re-base the Modular buildings. I wanted to keep the buildings intact and use their existing sidewalk area, but have them built over the studded portion of the road base plates.

When you add in the 3 and 4 way intersection plates for the corner buildings, this gets even more complicated. It means that each Modular building will need to be offset 6 studs forward and 6 studs to one side to fit onto the road plates, and that each building would now cover portions of four plates each. It also meant meticulously disassembling the base portion of each building, its sidewalk and any floor coverings and relocating them to the offset space. Its time consuming and can be pretty confusing, especially when you are using the original base as part of the new location at the same time you are still pulling pieces off of it.

The one downside to this design is that it leaves an odd space at the opposite end of the row of buildings from the corner building that wont fit another modular building, even the half size buildings that make up the 10218 Pet Shop. So I decided to just use these blank spaces as brick built alley ways. This design also leaves a larger space behind the buildings, which will allow me to run more track, either for storage, or attached to the main line to provide more siding traffic.

Lego City Layout: Module A
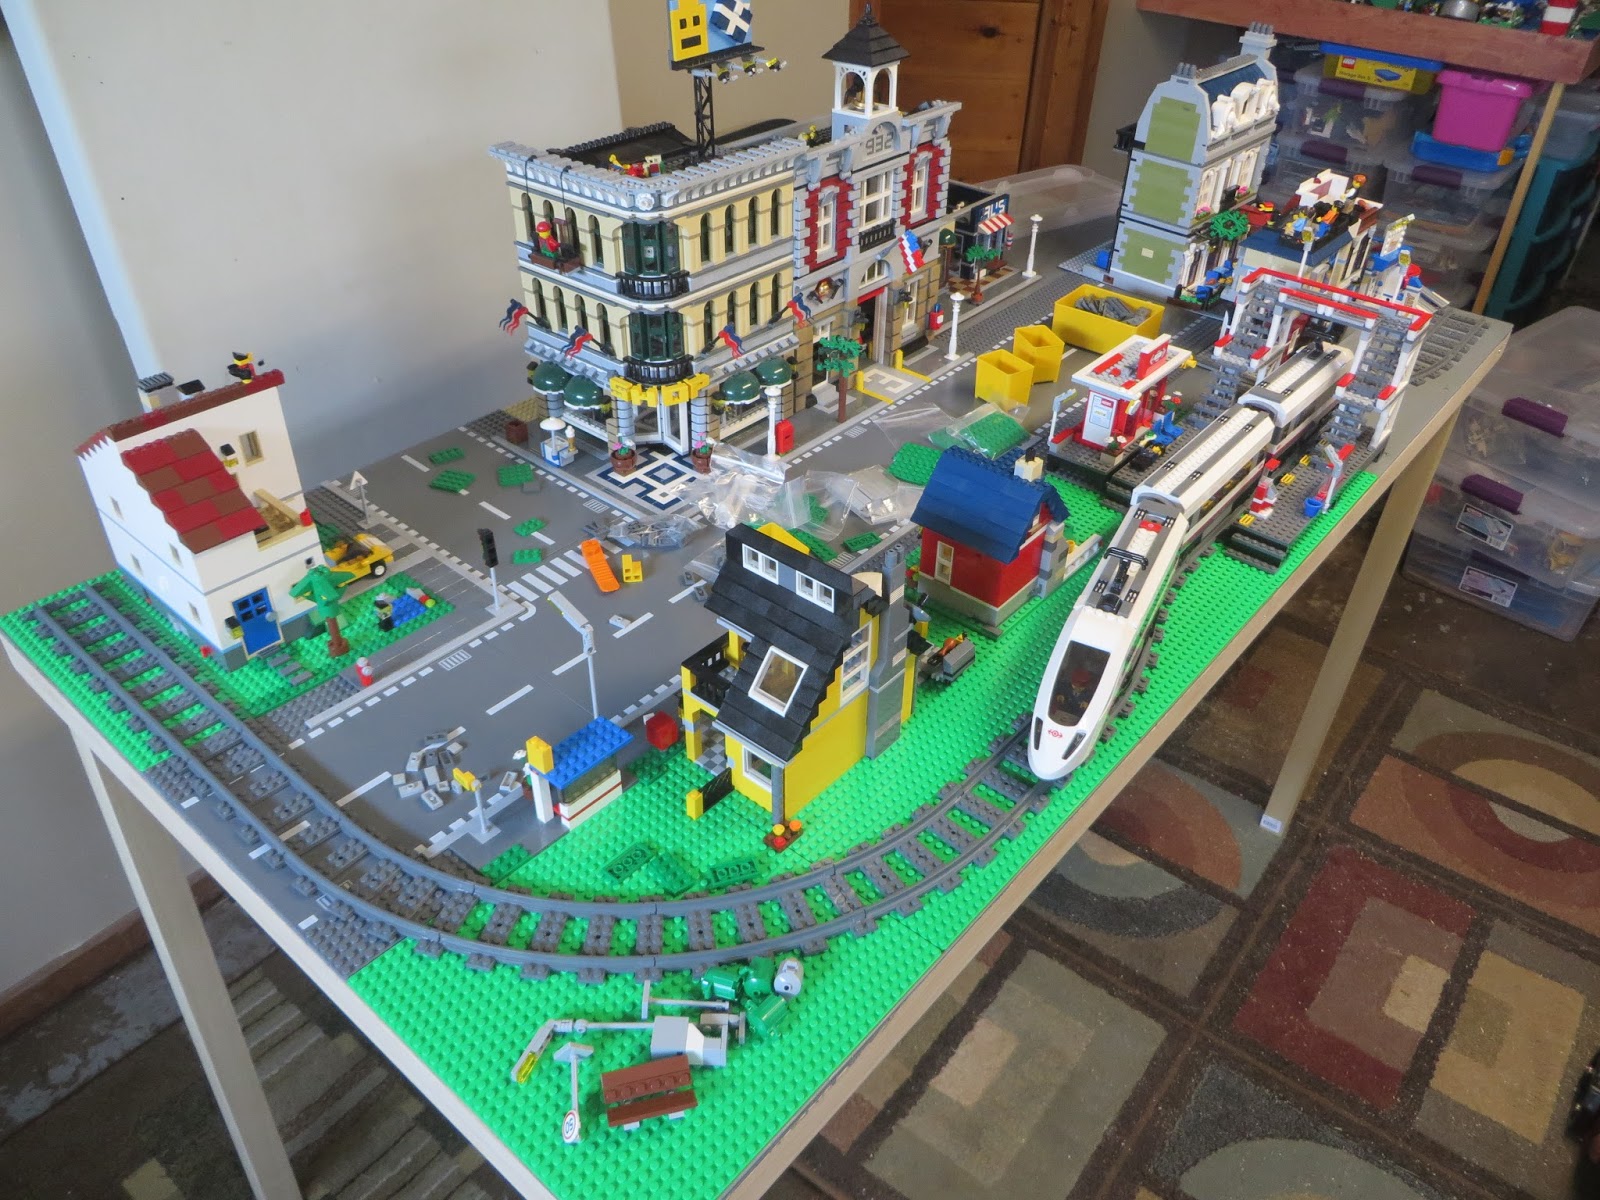
I started working in earnest on laying out base-plates and sets for the first module. This module is pretty straight forward, with a row of four Creator Modular buildings along the back, a street in the middle and then the outside table edge is mostly green base-plates with the rail line, the 7937 Train Station and a few Creator houses (4996 Beach House, 31009 Small Cottage and 31012 Family House).


The Modular Buildings from left to right are: 10211 Grand Emporium, 10197 Fire Brigade, 10246 Detectives Office and 10243 Parisian Restaurant.

There will be brick built sidewalks along most of the streets along with a bus stop and a few other details. I have two base-plates worth of empty space in one corner that will most likely be filled with some store fronts. Some of the side walks have been started, but I still need to add details (more fire hydrants, drain tiles etc).
Star Wars UCS: 10240 Red Five X-Wing Starfighter
This is my first foray into a Star Wars UCS model and I have to say I am beyond impressed. 10+ years ago I had collected some of the Star Wars sets, but then swore them off to concentrate my limited time and resources on trains and creator sets. Recently, with the renewed interest in Star Wars with the new movies coming out, I threw caution and self control to the wind and went nuts with Star Wars sets. The crown jewel of my collection is certainly this gorgeous model of Luke Skywalkers' personal X-wing!

I had seen this set at the Mall of America Lego store while in the Twin Cities waiting to fly to Florida, but foolishly decided to hold off until I got back to pick it up. Sure enough, when I returned from my trip, they had run out. So I ordered the set online via Lego.com even though it was out of stock with a 30 day time frame. It took the whole 30 days plus some but it was worth the wait!

The ship is massive, but very sturdy. I have had concerns about various Star Wars ship sets over the years that tended to be very fragile and to noticeably sag when displayed (in particular the UCS B-Wing). The construction techniques make the model very strong, there is no sagging in the wings at all and there is some serious weight to this model. The cockpit detail is great, with a well modeled seat, multiple control panels and a detailed control stick and drop down targeting computer (for those that cant use the force). The spring loaded and geared S-foil mechanism works great and is actuated by turning a "knob" in the rear of the ship that is well disguised as a round hatch.

The stand is simple but functional and R2-D2 scales just fine into this otherwise non-mini-figure scale set. The stickers for the canopy are a little difficult to apply, but you get an extra set and they look great, certainly enhancing the look of the set. The detail on the top hull behind the cockpit is excellent as are the engines and even the S-foil wing tip guns.

The set was also an absolute joy to build despite having some repetitive steps (mainly the alternate wing pairs, engines and guns) and most of the construction techniques are enjoyable to execute and behold. All in all, I have no complaints with this set and highly recommend it to anyone who likes Star Wars sets! I give this a firm 5/5.

Lego City Layout: Design Goals
With the modular bench-work for the layout coming together, I wanted to firm up my ideas for exactly what I wanted to do with the displays that would go on top of it. My primary goal and inspiration came from classic Lionel train displays which tended to showcase the collectible sets themselves (trains, buildings and operating accessories) by bringing them together in a polished display that while somewhat realistic, preserves a bit of a toy-like feel. I came up with a list of design principles and ideas that would govern how the layout would come together. Here is a summary:
- Layout will include Lego City, Train and relevant Creator sets in an integrated display. Most of the structures will be actual Lego kits and will be displayed mostly in their original form (where possible). I will concentrate on using sets, no my own creations for the most part. As tempting as it might be, I will try not to integrate unrelated set themes (oh look, 10193 Medieval Market can represent a renaissance fair in my City layout!). Having said that, nothing is complete without hiding pirates everywhere you can get away with it.
- I will be using the newer dark grey Lego road base-plates for most of the roads. I love the dedication some people are able to put into brick built roads, but I have neither the patience, money or skill to do that, and I like the look of the base-plates just fine.
- The entire surface will be covered in base-plates of some sort, no exposed table top (except what peaks between the cracks).
- New Power Function based trains with corresponding plastic track. I have some of the old 9V stuff, but I have far more PF equipment and its much more available, plus its easier to run multiple trains at the same time on the the track with the wireless PF controllers.
- I will use brick-built sidewalks modeled after the ones on the Creator Modular buildings as much as possible.
- Open back building sets will be used, as much as possible the backs will face a table edge. On buildings that hinge and split open (for example, most creator building sets like 31026 Bike Shop & Cafe) the opening feature will be preserved so the interior can still be accessed.
Lego City Layout: New Benchwork
After loosely laying out most of my Lego Train and City material on my old HO train set bench work, I spotted a couple design flaws right away. The first, was that the L shape of the bench work and the curve radius of the Lego train track would make it very difficult to fit a loop of track on the display, precluding the ability to have a continuously running train. Also, Lego base-plates come in dimensions based off multiples of 5 inches. The existing bench work was all sorts of different dimensions, none of them remotely related to the standard base-plate sizes. This made it very awkward to fit things in place and make everything work. Plus, I wanted a display that could be at least somewhat portable and expandable. So I decided last month that if I wanted to be serious about a Lego Train and City display, I would need to come up with a design dedicated to that purpose. I laid out some design priorities and ran through a variety of ideas, ultimately deciding on a design that would be entirely modular: Light weight tables of consistent measurements with detachable legs that can fit together in a number of expandable configurations, while allowing room underneath for my storage boxes. The final design would be 30 inches by 60 inches. Standard Lego base-plates are 10 inches, so this would allow each table to fit 18 base-plates, plenty of room! For the initial and most simplistic layout, I can run tables together in a square with a 30 inch by 30 inch space in the middle and allow for a continuous train track loop around the outside. This also allows me to work on the layout in bite size chunks, building one table, working on the display for it and then only moving on to the next one when I am done with the previous. To that end, I dived in, and went to my local home improvement store, having them custom cut a 4x8 foot piece of quarter inch sanded plywood down to a 30x60 inch size (to save myself some cutting at home and trying to transport a full size sheet of plywood). I also grabbed some 1x2 inch sanded boards for creating the actual frame and some 2x2 sanded pine legs in pre-cut 3 foot lengths. With the top itself and the legs pre-cut, I only had to do some simple miter saw work to cut down the 5 pieces of 1x2 for the frame. I went for a simple outside frame with a single cross brace, screwed it all together along with the plywood top and then sanded the edges and faces of the whole table to give it a nice, smooth, semi finished look. I also painted the top of the display a gloss dark grey (very similar to the grey of the Lego road base-plates I would be using) so that nothing obvious would show through the cracks between the base-plates. Long term, I will eventually attach wider, finished fascia boards all around the outside that will cover up joints, screws and the edge of the plywood top, along with sticking up above the table top by a 1/4 inch to help keep base-plates from sliding off.


The Big One - Lego City Layout
I have collected a wide range of Lego sets over the years, but my greatest passion has always been trains. I have always loved the idea of train sets ever since I was a kid, and have dabbled in HO and later, Lionel train sets. The problem is, honestly I am not very good at it. I have lots of ideas of complex, detailed and realistic displays, but lack the time, patience and skill sets to make it happen. Five years ago, I built a large L shaped HO train set in my tuck under garage. Since then it has languished, never getting past mostly completed track and some buildings. A couple years ago, I finally broke down and realized that I would never be able to finish it, so I pulled up all the track and put the trains and buildings in storage. But what to do with all that bench work? And with my ever growing collection of Lego's? I decided to combine the two and attempt to build a Lego Train display based loosely off a classic Lionel type layout (detailed and functional but having a surreal "TV Land" feel to it). And so my first initial haphazard attempt was born:


Subscribe to:
Posts (Atom)